29、Clone trait
复制值(第一部分)
上一章我们学到了所有权和借用。
特别指出了:
- Rust中每个值在任何给定的时间都有一个调用者。
- 当函数获取到一个值的所有权时(它消耗了它),函数的调用者就不能再使用这个值了。
这些限制可能有一些局限性。有时候,我们可能需要调用一个获取某个值所有权的函数,但是之后我们可能还需要使用这个值。
fn consumer(s: String) { /* */ }

fn example() {
     let mut s = String::from("hello");
     consumer(s);
     s.push_str(", world!"); // error: value borrowed here after move
}
这就是Clone的用武之地。
Clone
clone是一个定义在Rust标准库里面的trait。
pub trait Clone {
    fn clone(&self) -> Self;
}
它的方法clone接受self的一个引用,并返回一个新的相同类型的自有所有权的实例。
使用Clone
回到最上面的例子,我们可以在调用consumer之前使用clone创建一个新的String实例。
fn consumer(s: String) { /* */ }

fn example() {
     let mut s = String::from("hello");
     let t = s.clone();
     consumer(t);
     s.push_str(", world!"); // no error
}
我们没有把s的所有权交给consumer,而是在这之前创建了一个新的字符串(通过clones),并将其交给consumer。
Clone下的内存
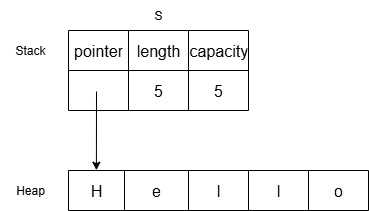
让我们看一下上面例子中的内存发生了什么。当let mut s=String::from("Hello");执行的时候,内存情况如下:

当执行let t=s.clone()时,会在堆上开辟一个新的区域来存储数据的拷贝。

可以把clone类似理解为C++,Java等语言里面的深拷贝。
实现Clone
要让一个类型可以使用Clone,必须要为它实现Clone trait。
我们还是可以用派生宏来实现Clone。
#[derive(Clone)]
struct MyType {
    // fields
}
补充:就像之前学到的那样,我们还是可以用用cargo expand来查看派生宏生成的代码。
练习
// TODO: add the necessary `Clone` implementations (and invocations)
//  to get the code to compile.

pub fn summary(ticket: Ticket) -> (Ticket, Summary) {
    (ticket/* TODO */, ticket.summary())
}

/* TODO */
pub struct Ticket {
    pub title: String,
    pub description: String,
    pub status: String,
}

impl Ticket {
    pub fn summary(self) -> Summary {
        Summary {
            title: self.title,
            status: self.status,
        }
    }
}

pub struct Summary {
    pub title: String,
    pub status: String,
}

fn main() {}
这次的练习还挺简单的,就是为Ticket实现Clone trait。然后在summary方法中返回Clone好的Ticket实例即可。
代码如下:
// TODO: add the necessary `Clone` implementations (and invocations)
//  to get the code to compile.

pub fn summary(ticket: Ticket) -> (Ticket, Summary) {
    (ticket.clone(), ticket.summary())
}

#[derive(Clone)]
pub struct Ticket {
    pub title: String,
    pub description: String,
    pub status: String,
}

impl Ticket {
    pub fn summary(self) -> Summary {
        Summary {
            title: self.title,
            status: self.status,
        }
    }
}

pub struct Summary {
    pub title: String,
    pub status: String,
}

fn main() {}
也是顺利通过了!
这一节的学习就先到这里了。
阅读剩余
版权声明:
作者:CN059
链接:https://www.cn059.com/2025/09/15/29%e3%80%81clone-trait.html
文章版权归作者所有,未经允许请勿转载。
THE END
