13、Modules(模块)
Modules(模块)
上一节,我们在new函数中单独写明对字符串的格式约束,但是存在一个问题。
pub fn new(title: String, description: String, status: String) -> Self {
    if status!="To-Do"&&status!="In Progress"&&status!="Done"{
        panic!("Only `To-Do`, `In Progress`, and `Done` statuses are allowed");
    }
    if title.is_empty(){
        panic!("Title cannot be empty");
    }
    if description.is_empty(){
        panic!("Description cannot be empty");
    }
    if title.len()>50{
        panic!("Title cannot be longer than 50 bytes");
    }
    if description.len()>500{
        panic!("Description cannot be longer than 500 bytes");
    }
    Self {
        title,
        description,
        status,
    }
}
new函数可能根本没被调用就创建好了结构体对象,如果 new 没有被调用,那你可能直接用 Struct { ... } 写法构建结构体,比如:
let task = Task {
    title: "".to_string(),
    description: "hello".to_string(),
    status: "Invalid".to_string(),
};
这就绕过了 new 中的校验逻辑 —— 这正是我们这一节需要解决的问题!
要实现正确的封装,我们需要熟悉两个新概念——visibility(可见性)和modules(模块)。
这一节,我们就先来学习模块。
什么是模块?
在rust中,模块是一种把代码相互关联组织起来放在同一个命名空间(即模块的名称)下的方式。
我们能看到模块的实际应用:验证代码正确性的单元测试定义在另一个名为测试的模块中。
#[cfg(test)]
mod tests {
    // [...]
}
内联模块
内联模块是指声明和内容紧挨着的模块
上面的tests模块就是一个内联模块的例子:模块声明(mod tests)和模块内容({ ... }内的内容)紧挨着。
模块树
Rust中的模块是可以嵌套的,形成树状结构,其中,根模块是这个crate本身,它是包含其他所有模块的顶级模块。
对于library crate(库crate),根模块通常为src/lib.rs(这是默认值)。
根模块也被称为 crate root 。
crate root可以有子模块,子模块也可以有子模块,以此类推。
外部模块与文件系统
Rust中的外部模块是在不同的文件中声明并使用mod关键字。
内联模块对于小型代码很有用,但是随着项目的发展,需要将代码拆分为多个文件。在父模块中,可以使用mod关键字声明子模块的存在。
Rust的构建工具cargo会负责寻找包含模块实现的代码文件。
如果模块是在crate的根目录中声明(例如src/lib.rs或src/main.rs),cargo希望该文件被命名为:
- src/<module_name>.rs
- src/<module_name>/mod.rs
如果模块是另外一个模块的子模块,那么这个文件应该被命名为:
- [..]/<parent_module>/<module_name>.rs
- [..]/<parent_module>/<module_name>/mod.rs
例如:src/animals/dog.rs或src/animals/dog/mod.rs。如果dog模块是animals模块的子模块。
当使用mod关键字声明新的模块时,IDE可以帮助我们自动创建这些文件。
项目路径与use关键字
在Rust中,通过指明文件在模块树中的位置,项目路径可以用于访问不同模块中的实体。
struct Ticket {
    // [...]
}

// No need to qualify `Ticket` in any way here
// because we're in the same module
// 无须在此处以任何方式定义Ticket
// 因为这都处于同一模块当中
fn mark_ticket_as_done(ticket: Ticket) {
    // [...]
}
如果要访问不同模块中的实体,必须使用指向要访问的实体的路径。
我们可以用不同的方式组成路径:
- 从当前 crate 的根目录开始,例如 crate::module_1::MyStruct
- 从父模块开始,例如 super::my_function
- 从当前模块开始,例如 sub_module_1::MyStruct
crate和super都是关键字,crate是指当前crate的根,而super是指当前模块的父模块。
每次要引用类型时都必须写明完整路径可能会很麻烦,通过引入user语句来将实体纳入作用域会更方便一些。
// Bring `MyStruct` into scope
use crate::module_1::module_2::MyStruct;

// Now you can refer to `MyStruct` directly
// 现在可以直接引用“MyStruct”结构体了
fn a_function(s: MyStruct) {
     // [...]
}
通配符导入
通配符导入是将该模块中所有的内容导入到当前作用域里。
use crate::module_1::module_2::*;
一般不鼓励使用这种方法,因为它会污染当前的命名空间,使人难以理解每个名称的来源,并可能引入名称冲突。
不过,在某些情况下,比如编写单元测试时,它还是很有用的。你可能已经注意到,我们的大多数测试模块都以 use super::*; 语句开头,以便将父模块(被测试模块)的所有项目引入作用域。
可视化模块树
我们可以尝试使用cargo-modules将模块树可视化。
首先在命令行安装cargo-modules,使用cargo install cargo-modules。
然后在项目根目录输入命令cargo-modules structure,输出当前的可视化模块树。
如图:
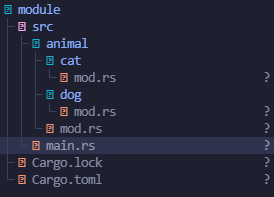
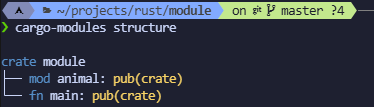
不过这里存在一些小问题,就是我的子模块没有显示出来,不知道为什么,等到时候我再研究研究。
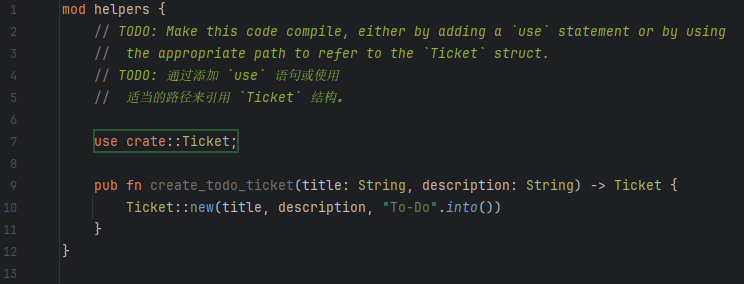
练习
这是本节的练习题
mod helpers {
    // TODO: Make this code compile, either by adding a `use` statement or by using
    //  the appropriate path to refer to the `Ticket` struct.
    // TODO: 通过添加 `use` 语句或使用
    //  适当的路径来引用 `Ticket` 结构。

    /* TODO */

    pub fn create_todo_ticket(title: String, description: String) -> Ticket {
        Ticket::new(title, description, "To-Do".into())
    }
}

struct Ticket {
    title: String,
    description: String,
    status: String,
}

impl Ticket {
    fn new(title: String, description: String, status: String) -> Ticket {
        if title.is_empty() {
            panic!("Title cannot be empty");
        }
        if title.len() > 50 {
            panic!("Title cannot be longer than 50 bytes");
        }
        if description.is_empty() {
            panic!("Description cannot be empty");
        }
        if description.len() > 500 {
            panic!("Description cannot be longer than 500 bytes");
        }
        if status != "To-Do" && status != "In Progress" && status != "Done" {
            panic!("Only `To-Do`, `In Progress`, and `Done` statuses are allowed");
        }

        Ticket {
            title,
            description,
            status,
        }
    }
}

fn main() {}
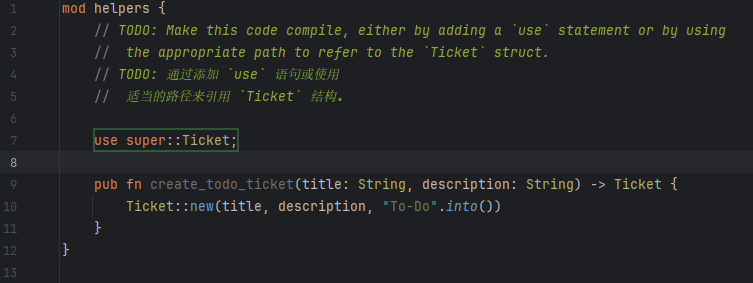
也挺简单的,顺利通过了
或者用super也可以
以上就是这一节的学习内容了